Posted in Practical

Notes on Planning for A-Level H2 Physics Practicals

Purpose of These Notes

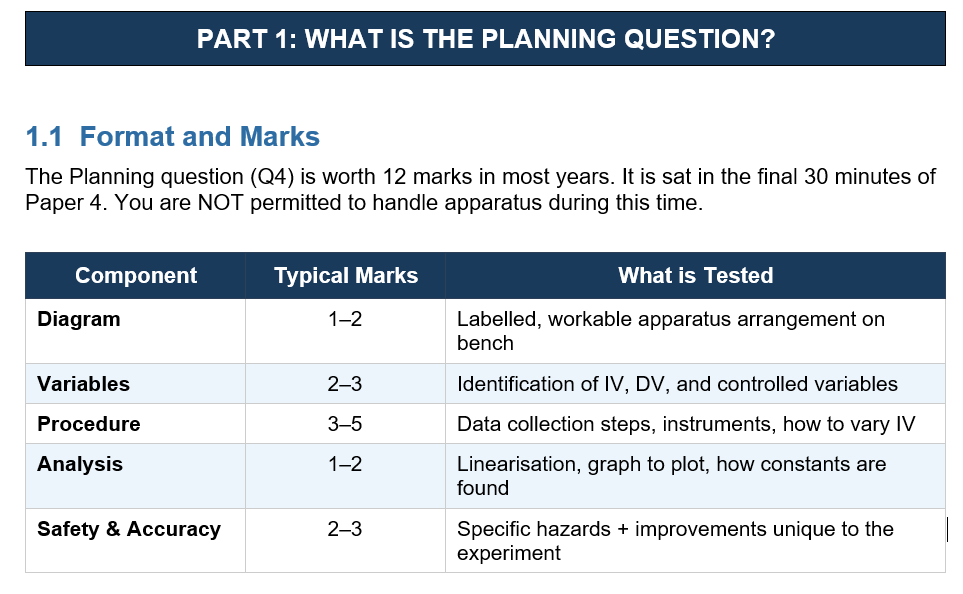
These notes provide a complete framework for answering the Planning question in the H2 Physics A-Level Paper 4 practical examination. A full Planning question is worth 11–12 marks and must be answered in the final 30 minutes of the paper. You may not touch any apparatus during this time.

Use these notes to understand: what each component of the answer is testing, exactly how to write it, common errors to avoid, and how a top-band response is structured.
1.2 How to Approach the Question (Time Strategy)
• Read the question carefully twice (2 min). Identify the equation and what constants need to be found.
• Sketch the diagram first — this locks in your apparatus before writing.
• Write variables explicitly before the procedure — markers look for these early.
• Write the procedure in numbered steps — never continuous prose.
• End with Safety and Accuracy — these often carry 3 marks and are easy to score.

⚠ You CANNOT earn marks by repeating information already given in the question. Read the question carefully and ensure every point you write adds new, specific information.

PART 2: THE EXACT FORMAT — COMPONENT BY COMPONENT

(a) Diagram

The diagram is worth 1–2 marks. It must show a WORKABLE setup that a student could actually build in a lab.

What a top-band diagram must include:
• A clear 2D side-view (or top-view if needed) — label it as such
• A drawn table-top (horizontal line at the bottom) — all apparatus rests on it
• All relevant apparatus labelled, including instrument names (e.g. ‘metre rule’, ‘GM tube’, ‘ratemeter’)
• Quantities to be measured labelled directly on the diagram (e.g. arrows showing distance d, thickness t)
• Retort stands and clamps shown where apparatus needs support
• Circuit diagrams (if electrical) using conventional symbols — do not draw 3D boxes

⚠ Equipment must not float in mid-air. If an instrument stands unsupported, it must be shown clamped to a retort stand. Equipment likely to topple (motors, heavy masses) must be firmly clamped.

Diagram Checklist: Table top drawn? All items labelled? Quantities marked with arrows/letters? Supports shown? No floating equipment?

(b) Defining the Problem — Variables

This section carries 2–3 marks. State variables explicitly, clearly, and quantifiably. Vague statements like ‘keep other factors the same’ score zero.


Singapore Learner has been a Comprehensive Science Practical Training provider since 2017.

As at 19 Apr 2026, we have trained about 1060 students for their science practical exams and we have conducted a total of about 4044 lab sessions.

Our laboratory apparatus are exam-grade and similar to those used in MOE schools and our chemicals are all NEA-approved.


Why Choose Us?

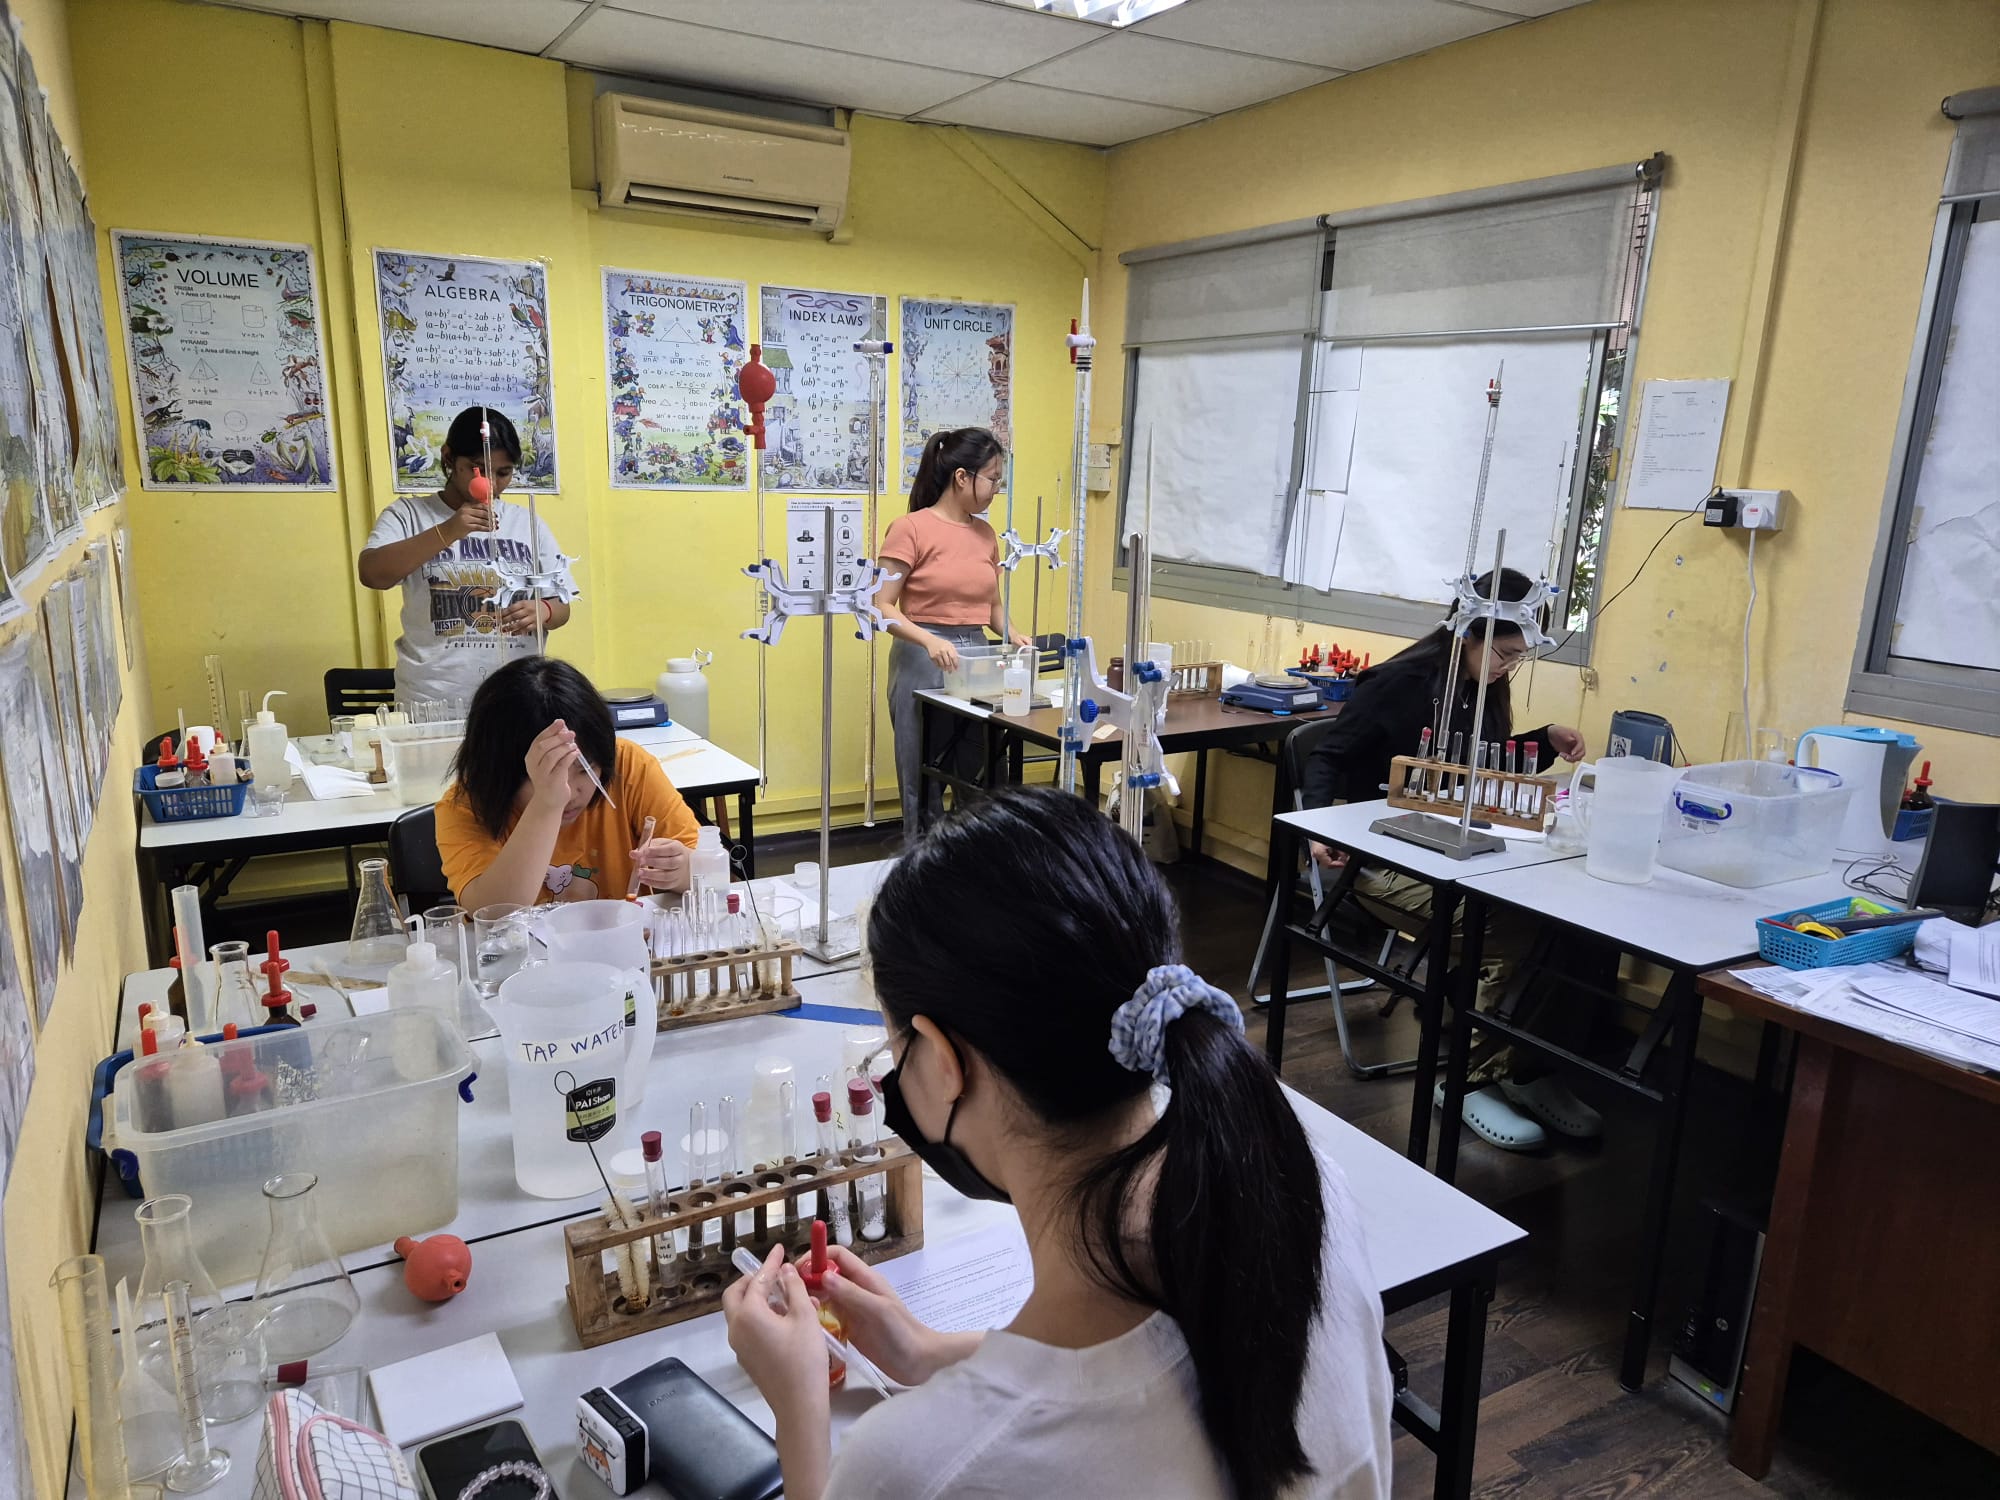
  • Our teachers are very experienced, and we actually TEACH you good practical techniques.
  • We have been a one-stop comprehensive science practical centre providing solid practical training for ALL THREE sciences and for all levels and streams since 2017.
  • Our laboratory apparatus are exam-grade and similar to those used in MOE schools and our chemicals are all NEA-approved.
  • We have a structured practical training programme catering to the needs of both beginners and experienced students.
  • We have a small class size so that the teacher is able to observe the actions of each student more closely and demonstrate the correct practical techniques where and when necessary.
  • Many private schools trust us to prepare and conduct science practical training and assessment for their students, including structured training, mock exams and even actual CIE science practical exams.
Our Main Practical Programmes:

A-LEVEL H2 PRACTICALS (Available Nov to Oct)

O-LEVEL PRACTICALS (Available Nov to Oct)

PRACTICAL CRASH COURSES (Jun, July, Sep and Oct)

MOCK EXAMS FOR SCIENCE PRACTICAL (Apr to Oct)

Posted in Practical

Notes on Planning for A-Level H2 Chemistry Practicals

Purpose of These Notes

These notes cover all five types of Planning questions tested in H2 Chemistry Paper 4: Volumetric Analysis (Titration), Gravimetric Analysis, Gas Collection, Energetics, and Kinetics. For each type, you will find: what the question is testing, the exact procedural format with precision-tagged steps, a worked example using the thermometric titration question from RVHS 2024, a mark scheme, and the most common errors.

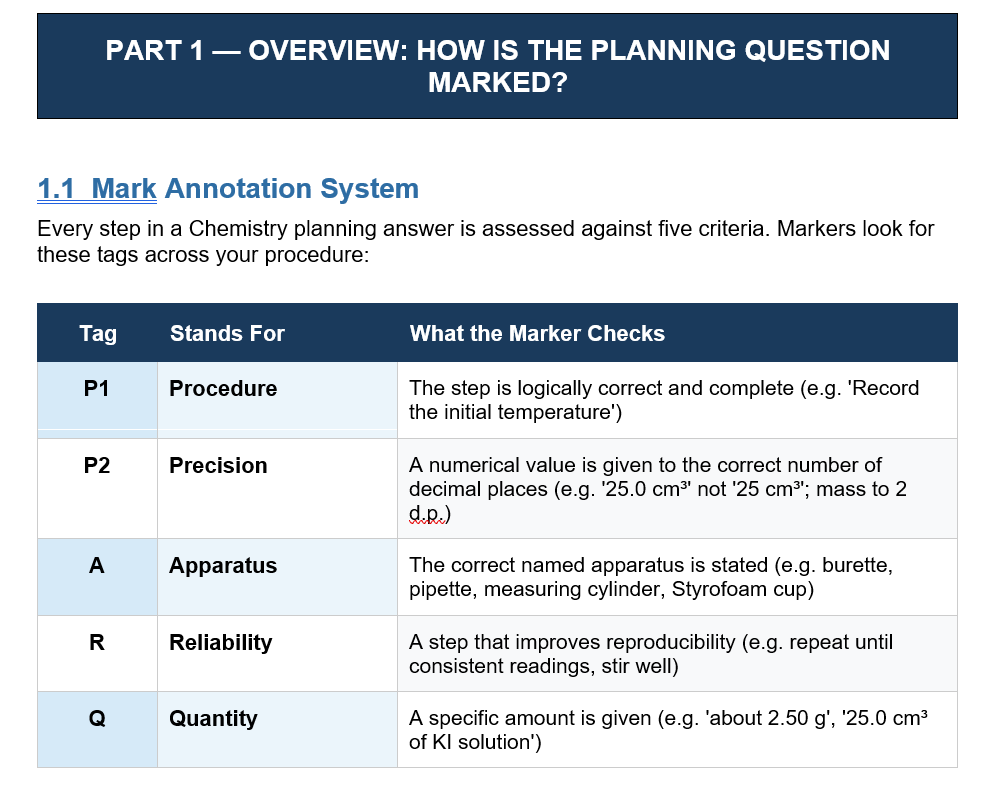
The mark annotation system used throughout: (P1) = Procedure, (P2) = Precision, (A) = Apparatus, (R) = Reliability, (Q) = Quantity.


1.2 General Rules That Apply to ALL Planning Questions
• Write your procedure in numbered steps — never continuous prose.
• Every step must name the apparatus and give the quantity to the correct precision.
• State both the initial and the final measurement for every instrument used.
• Reliability steps (repeat until consistent) must be specific — state the tolerance (e.g. ±0.10 cm³, ±0.01 g).
• Safety: name the specific chemical involved and the specific hazard it poses. Give the action to take, not the action to avoid.

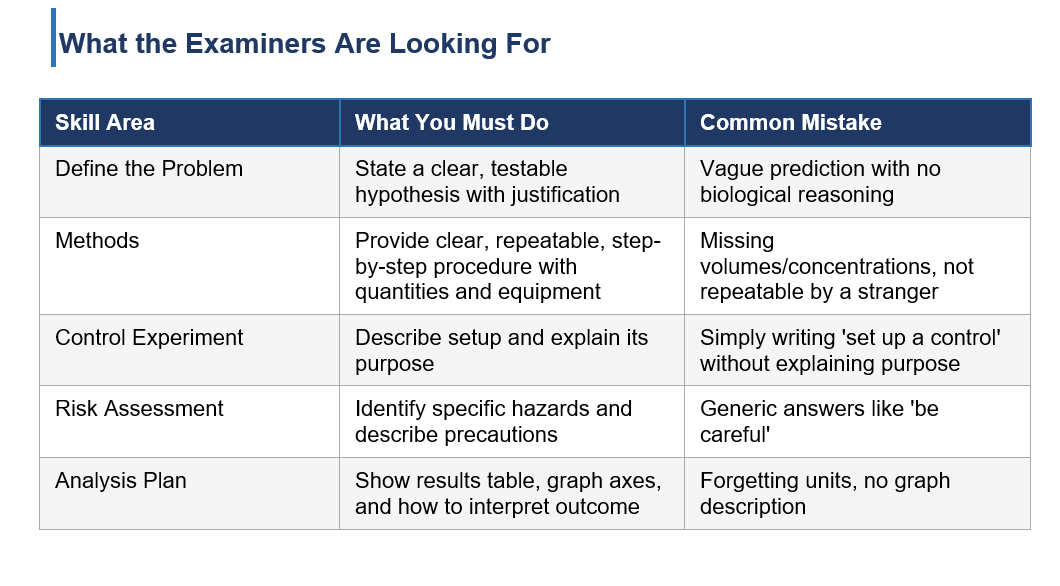
⚠ Never repeat information already given in the question. Read the question stem carefully — restating given facts scores zero.

PART 2 — VOLUMETRIC ANALYSIS (TITRATION)

2.1 What is Tested

Titration questions ask you to determine an unknown concentration, basicity (number of acidic H⁺), or percentage purity. They may involve: acid-base titration, back titration, redox titration (MnO₄⁻ or iodometric), or thermometric titration. The planning always follows a three-phase structure: (i) preparation of standard solution, (ii) dilution if needed, (iii) the titration itself.

2.2  Pre-Experimental Calculation — Titre Volume

Before writing any procedure, check whether a dilution is needed. The key rule:

Key RuleTarget titre volume: 10.00 – 40.00 cm³. If concentrations differ by a factor of 10 or more, dilute first using C₁V₁ = C₂V₂. Use a 250 cm³ volumetric flask for dilution.

A titre that is too high → requires burette refill → high % error.

A titre that is too low → small volume → high % error from burette uncertainty (±0.05 cm³ per reading).

Percentage error in burette = (0.10 / titre volume) × 100%. Target ≤ 0.5%.

2.3  Indicator Selection

Choosing the wrong indicator is a common and costly error. Always match indicator to the type of titration.

2.4 The Standard Procedure — Step by Step


Phase 1: Preparation of Standard Solution (from solid)

  1. Weigh accurately about [mass to 2 d.p.] g (P2), (Q) of [name of solid] into a dry and clean (R) weighing bottle (A), (P1).
  2. Transfer the solid quantitatively into a 100 cm³ beaker (A). Reweigh the emptied weighing bottle and record its mass (P1). Calculate the actual mass transferred (P1).
  3. Add from a 50.00 cm³ (P2) burette (A), [volume to 2 d.p.] cm³ (P2) of [solvent/acid] to dissolve the solid. Swirl until fully dissolved (R), (P1).
  4. Transfer the solution and all washings into a 250 cm³ volumetric flask (A). Make up to the mark with deionised water (P1).
  5. Stopper and shake the flask and mix thoroughly to obtain a homogeneous solution (P1).

⚠ Always reweigh the emptied weighing bottle — this gives the actual mass transferred. Do NOT weigh into the volumetric flask directly.

Phase 2: The Titration

  1. Pipette 25.0 cm³ (P2), (Q) of [analyte solution] into a 250 cm³ conical flask (A), (P1).
  2. Add 2–3 drops of indicator name into the conical flask.
  3. Fill a 50.00 cm³ burette (A) with [titrant solution] and record the initial burette reading to 2 d.p. (P1), (P2).
  4. Titrate [titrant] against [analyte]. Add dropwise near the endpoint. Swirl the flask continuously (R). Stop when the solution changes from [colour A] to [colour B] and the colour persists for 30 s (P1).
  5. Record the final burette reading and calculate the titre (P1). Repeat until two titre values are consistent within ±0.10 cm³ (R). Use the mean of the consistent readings (P1).

The full set of Planning notes is available in hard copy for students who sign up for any of our regular practical lessons, Crash Courses or Mock Exams.


Singapore Learner has been a Comprehensive Science Practical Training provider since 2017.

As at 19 Apr 2026, we have trained about 1060 students for their science practical exams and we have conducted a total of about 4044 lab sessions.

Our laboratory apparatus are exam-grade and similar to those used in MOE schools and our chemicals are all NEA-approved.


Why Choose Us?

  • Our teachers are very experienced, and we actually TEACH you good practical techniques.
  • We have been a one-stop comprehensive science practical centre providing solid practical training for ALL THREE sciences and for all levels and streams since 2017.
  • Our laboratory apparatus are exam-grade and similar to those used in MOE schools and our chemicals are all NEA-approved.
  • We have a structured practical training programme catering to the needs of both beginners and experienced students.
  • We have a small class size so that the teacher is able to observe the actions of each student more closely and demonstrate the correct practical techniques where and when necessary.
  • Many private schools trust us to prepare and conduct science practical training and assessment for their students, including structured training, mock exams and even actual CIE science practical exams.
Our Main Practical Programmes:

A-LEVEL H2 PRACTICALS (Available Nov to Oct)

O-LEVEL PRACTICALS (Available Nov to Oct)

PRACTICAL CRASH COURSES (Jun, July, Sep and Oct)

MOCK EXAMS FOR SCIENCE PRACTICAL (Apr to Oct)

Posted in Practical

Notes on Planning for A-Level H2 Biology Practicals

Section 1: What is Planning?

The Planning (P) component of Paper 4 tests your ability to design a complete, workable scientific investigation from scratch. You are given a research question and a list of materials, and you must produce a structured experimental plan that a stranger could follow and repeat.

Key Insight: Planning is not just about listing steps. Every mark corresponds to a specific component — hypothesis, variables, method, control, data recording, and risk. You must address ALL components to score full marks.

Section 2: The 6 Steps of a Perfect Planning Answer

Follow this structure EVERY TIME. Marks are allocated to specific components. A disorganised answer loses marks even if it contains the right information. Always use numbered steps and subheadings.

Step 1: Hypothesis
What to write
A hypothesis is a specific, testable, quantitative prediction of what you expect to happen, with biological justification. It must reference the independent variable (IV) and dependent variable (DV).

Exact Format
STRUCTURE: [DV] will [increase/decrease] as [IV] increases, because [biological mechanism].

Mark-scoring Example
“The rate of photosynthesis (measured by the extent of colour change of hydrogencarbonate indicator) will increase as the concentration of NaHCO3 increases, because a higher substrate (CO2) concentration increases the frequency of enzyme-substrate collisions at RuBisCO, increasing the rate of the Calvin cycle.”

NEVER write: “The plant will photosynthesise more.” — This is vague, has no reference to IV/DV, and no mechanism.

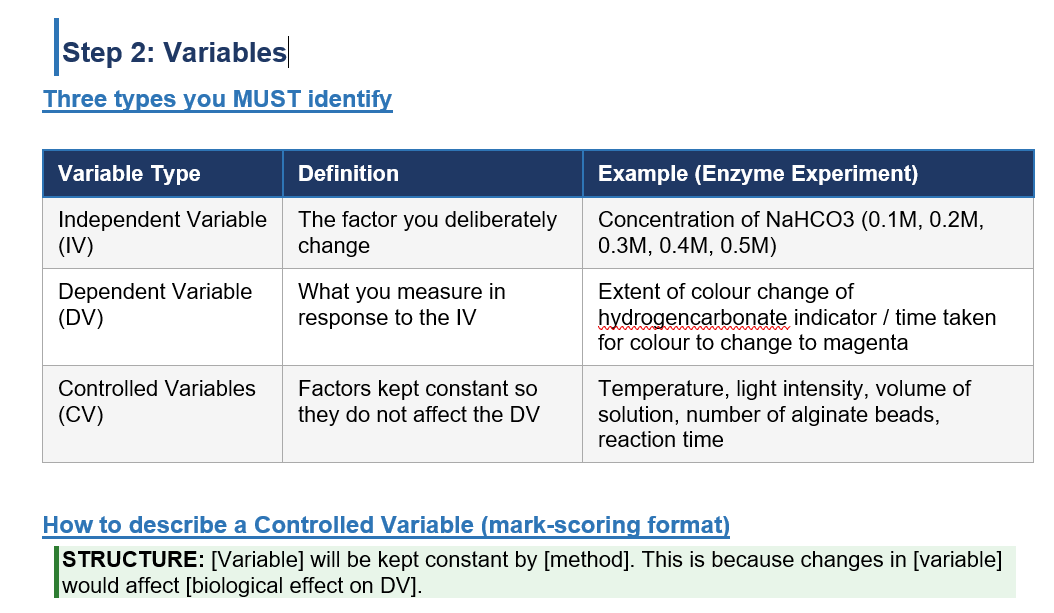
“Temperature will be maintained at 25°C using a water bath monitored with a thermometer. This is because changes in temperature alter the kinetic energy of molecules, affecting the rate of enzyme-catalysed reactions and hence the DV.”

Step 3: Control Experiment

A control experiment is a modified version of your experiment where the independent variable is removed or negated (replaced, NOT simply omitted). It proves that the result you observe is due to the IV and not any other factor.

CRITICAL RULE: You must REPLACE the IV — never just remove it. Everything else stays the same.


The full set of Planning notes is available in hard copy for students who sign up for any of our regular practical lessons, Crash Courses or Mock Exams.


Singapore Learner has been a Comprehensive Science Practical Training provider since 2017.

As at 19 Apr 2026, we have trained about 1060 students for their science practical exams and we have conducted a total of about 4044 lab sessions.

Our laboratory apparatus are exam-grade and similar to those used in MOE schools and our chemicals are all NEA-approved.


Why Choose Us?

  • Our teachers are very experienced, and we actually TEACH you good practical techniques.
  • We have been a one-stop comprehensive science practical centre providing solid practical training for ALL THREE sciences and for all levels and streams since 2017.
  • Our laboratory apparatus are exam-grade and similar to those used in MOE schools and our chemicals are all NEA-approved.
  • We have a structured practical training programme catering to the needs of both beginners and experienced students.
  • We have a small class size so that the teacher is able to observe the actions of each student more closely and demonstrate the correct practical techniques where and when necessary.
  • Many private schools trust us to prepare and conduct science practical training and assessment for their students, including structured training, mock exams and even actual CIE science practical exams.
Our Main Practical Programmes:

A-LEVEL H2 PRACTICALS (Available Nov to Oct)

O-LEVEL PRACTICALS (Available Nov to Oct)

PRACTICAL CRASH COURSES (Jun, July, Sep and Oct)

MOCK EXAMS FOR SCIENCE PRACTICAL (Apr to Oct)