All Posts

Posted in Practical

Notes on Planning for A-Level H2 Physics Practicals

Purpose of These Notes

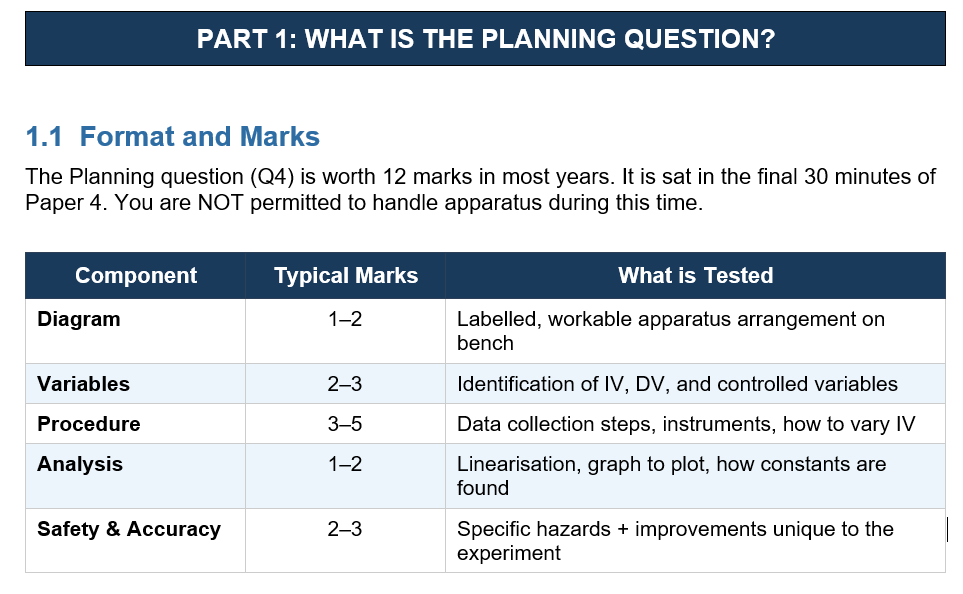
These notes provide a complete framework for answering the Planning question in the H2 Physics A-Level Paper 4 practical examination. A full Planning question is worth 11–12 marks and must be answered in the final 30 minutes of the paper. You may not touch any apparatus during this time.

Use these notes to understand: what each component of the answer is testing, exactly how to write it, common errors to avoid, and how a top-band response is structured.
1.2 How to Approach the Question (Time Strategy)
• Read the question carefully twice (2 min). Identify the equation and what constants need to be found.
• Sketch the diagram first — this locks in your apparatus before writing.
• Write variables explicitly before the procedure — markers look for these early.
• Write the procedure in numbered steps — never continuous prose.
• End with Safety and Accuracy — these often carry 3 marks and are easy to score.

⚠ You CANNOT earn marks by repeating information already given in the question. Read the question carefully and ensure every point you write adds new, specific information.

PART 2: THE EXACT FORMAT — COMPONENT BY COMPONENT

(a) Diagram

The diagram is worth 1–2 marks. It must show a WORKABLE setup that a student could actually build in a lab.

What a top-band diagram must include:
• A clear 2D side-view (or top-view if needed) — label it as such
• A drawn table-top (horizontal line at the bottom) — all apparatus rests on it
• All relevant apparatus labelled, including instrument names (e.g. ‘metre rule’, ‘GM tube’, ‘ratemeter’)
• Quantities to be measured labelled directly on the diagram (e.g. arrows showing distance d, thickness t)
• Retort stands and clamps shown where apparatus needs support
• Circuit diagrams (if electrical) using conventional symbols — do not draw 3D boxes

⚠ Equipment must not float in mid-air. If an instrument stands unsupported, it must be shown clamped to a retort stand. Equipment likely to topple (motors, heavy masses) must be firmly clamped.

Diagram Checklist: Table top drawn? All items labelled? Quantities marked with arrows/letters? Supports shown? No floating equipment?

(b) Defining the Problem — Variables

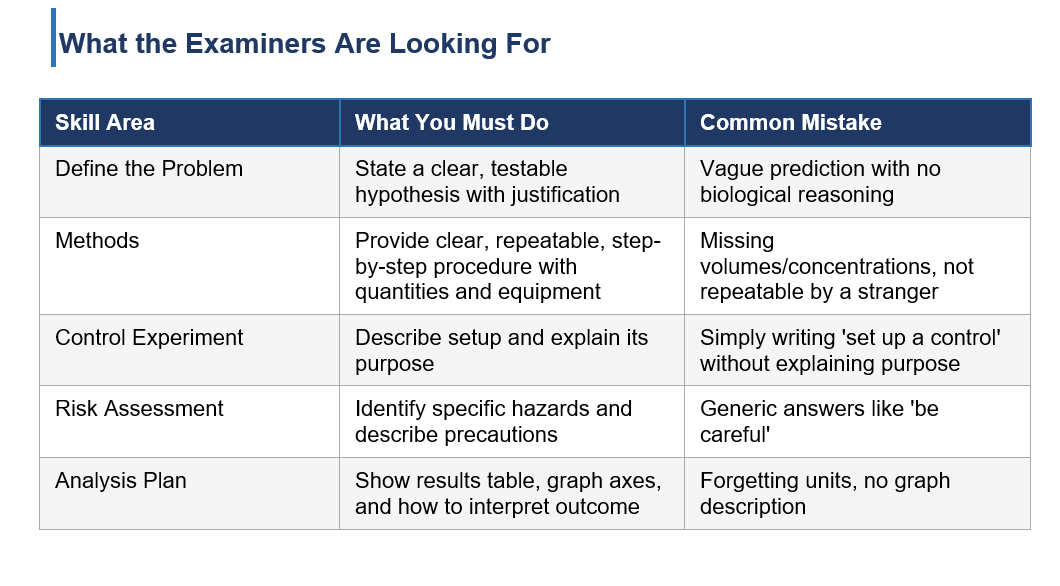
This section carries 2–3 marks. State variables explicitly, clearly, and quantifiably. Vague statements like ‘keep other factors the same’ score zero.


Singapore Learner has been a Comprehensive Science Practical Training provider since 2017.

As at 19 Apr 2026, we have trained about 1060 students for their science practical exams and we have conducted a total of about 4044 lab sessions.

Our laboratory apparatus are exam-grade and similar to those used in MOE schools and our chemicals are all NEA-approved.


Why Choose Us?

  • Our teachers are very experienced, and we actually TEACH you good practical techniques.
  • We have been a one-stop comprehensive science practical centre providing solid practical training for ALL THREE sciences and for all levels and streams since 2017.
  • Our laboratory apparatus are exam-grade and similar to those used in MOE schools and our chemicals are all NEA-approved.
  • We have a structured practical training programme catering to the needs of both beginners and experienced students.
  • We have a small class size so that the teacher is able to observe the actions of each student more closely and demonstrate the correct practical techniques where and when necessary.
  • Many private schools trust us to prepare and conduct science practical training and assessment for their students, including structured training, mock exams and even actual CIE science practical exams.

Our Main Practical Programmes:

A-LEVEL H2 PRACTICALS (Available Nov to Oct)

O-LEVEL PRACTICALS (Available Nov to Oct)

PRACTICAL CRASH COURSES (Jun, July, Sep and Oct)

MOCK EXAMS FOR SCIENCE PRACTICAL (Apr to Oct)

Posted in Practical

Notes on Planning for A-Level H2 Chemistry Practicals

Purpose of These Notes

These notes cover all five types of Planning questions tested in H2 Chemistry Paper 4: Volumetric Analysis (Titration), Gravimetric Analysis, Gas Collection, Energetics, and Kinetics. For each type, you will find: what the question is testing, the exact procedural format with precision-tagged steps, a worked example using the thermometric titration question from RVHS 2024, a mark scheme, and the most common errors.

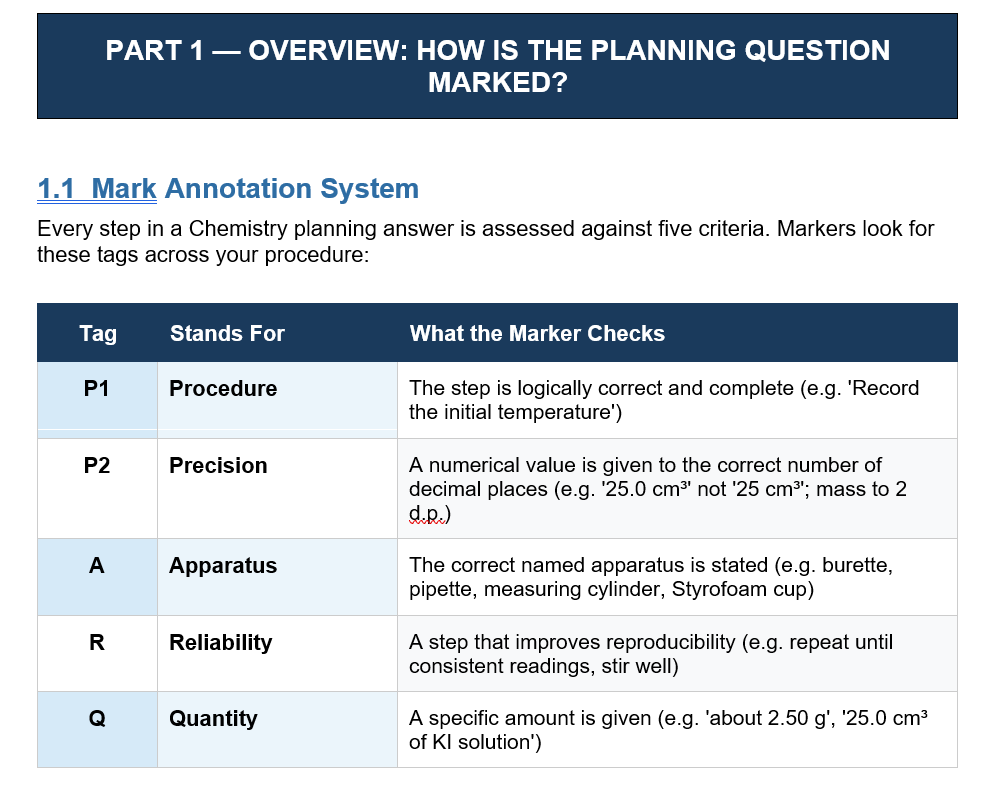
The mark annotation system used throughout: (P1) = Procedure, (P2) = Precision, (A) = Apparatus, (R) = Reliability, (Q) = Quantity.


1.2 General Rules That Apply to ALL Planning Questions
• Write your procedure in numbered steps — never continuous prose.
• Every step must name the apparatus and give the quantity to the correct precision.
• State both the initial and the final measurement for every instrument used.
• Reliability steps (repeat until consistent) must be specific — state the tolerance (e.g. ±0.10 cm³, ±0.01 g).
• Safety: name the specific chemical involved and the specific hazard it poses. Give the action to take, not the action to avoid.

⚠ Never repeat information already given in the question. Read the question stem carefully — restating given facts scores zero.

PART 2 — VOLUMETRIC ANALYSIS (TITRATION)

2.1 What is Tested

Titration questions ask you to determine an unknown concentration, basicity (number of acidic H⁺), or percentage purity. They may involve: acid-base titration, back titration, redox titration (MnO₄⁻ or iodometric), or thermometric titration. The planning always follows a three-phase structure: (i) preparation of standard solution, (ii) dilution if needed, (iii) the titration itself.

2.2  Pre-Experimental Calculation — Titre Volume

Before writing any procedure, check whether a dilution is needed. The key rule:

Key RuleTarget titre volume: 10.00 – 40.00 cm³. If concentrations differ by a factor of 10 or more, dilute first using C₁V₁ = C₂V₂. Use a 250 cm³ volumetric flask for dilution.

A titre that is too high → requires burette refill → high % error.

A titre that is too low → small volume → high % error from burette uncertainty (±0.05 cm³ per reading).

Percentage error in burette = (0.10 / titre volume) × 100%. Target ≤ 0.5%.

2.3  Indicator Selection

Choosing the wrong indicator is a common and costly error. Always match indicator to the type of titration.

2.4 The Standard Procedure — Step by Step


Phase 1: Preparation of Standard Solution (from solid)

  1. Weigh accurately about [mass to 2 d.p.] g (P2), (Q) of [name of solid] into a dry and clean (R) weighing bottle (A), (P1).
  2. Transfer the solid quantitatively into a 100 cm³ beaker (A). Reweigh the emptied weighing bottle and record its mass (P1). Calculate the actual mass transferred (P1).
  3. Add from a 50.00 cm³ (P2) burette (A), [volume to 2 d.p.] cm³ (P2) of [solvent/acid] to dissolve the solid. Swirl until fully dissolved (R), (P1).
  4. Transfer the solution and all washings into a 250 cm³ volumetric flask (A). Make up to the mark with deionised water (P1).
  5. Stopper and shake the flask and mix thoroughly to obtain a homogeneous solution (P1).

⚠ Always reweigh the emptied weighing bottle — this gives the actual mass transferred. Do NOT weigh into the volumetric flask directly.

Phase 2: The Titration

  1. Pipette 25.0 cm³ (P2), (Q) of [analyte solution] into a 250 cm³ conical flask (A), (P1).
  2. Add 2–3 drops of indicator name into the conical flask.
  3. Fill a 50.00 cm³ burette (A) with [titrant solution] and record the initial burette reading to 2 d.p. (P1), (P2).
  4. Titrate [titrant] against [analyte]. Add dropwise near the endpoint. Swirl the flask continuously (R). Stop when the solution changes from [colour A] to [colour B] and the colour persists for 30 s (P1).
  5. Record the final burette reading and calculate the titre (P1). Repeat until two titre values are consistent within ±0.10 cm³ (R). Use the mean of the consistent readings (P1).

The full set of Planning notes is available in hard copy for students who sign up for any of our regular practical lessons, Crash Courses or Mock Exams.


Singapore Learner has been a Comprehensive Science Practical Training provider since 2017.

As at 19 Apr 2026, we have trained about 1060 students for their science practical exams and we have conducted a total of about 4044 lab sessions.

Our laboratory apparatus are exam-grade and similar to those used in MOE schools and our chemicals are all NEA-approved.


Why Choose Us?

  • Our teachers are very experienced, and we actually TEACH you good practical techniques.
  • We have been a one-stop comprehensive science practical centre providing solid practical training for ALL THREE sciences and for all levels and streams since 2017.
  • Our laboratory apparatus are exam-grade and similar to those used in MOE schools and our chemicals are all NEA-approved.
  • We have a structured practical training programme catering to the needs of both beginners and experienced students.
  • We have a small class size so that the teacher is able to observe the actions of each student more closely and demonstrate the correct practical techniques where and when necessary.
  • Many private schools trust us to prepare and conduct science practical training and assessment for their students, including structured training, mock exams and even actual CIE science practical exams.

Our Main Practical Programmes:

A-LEVEL H2 PRACTICALS (Available Nov to Oct)

O-LEVEL PRACTICALS (Available Nov to Oct)

PRACTICAL CRASH COURSES (Jun, July, Sep and Oct)

MOCK EXAMS FOR SCIENCE PRACTICAL (Apr to Oct)

Posted in Practical

Notes on Planning for A-Level H2 Biology Practicals

Section 1: What is Planning?

The Planning (P) component of Paper 4 tests your ability to design a complete, workable scientific investigation from scratch. You are given a research question and a list of materials, and you must produce a structured experimental plan that a stranger could follow and repeat.

Key Insight: Planning is not just about listing steps. Every mark corresponds to a specific component — hypothesis, variables, method, control, data recording, and risk. You must address ALL components to score full marks.

Section 2: The 6 Steps of a Perfect Planning Answer

Follow this structure EVERY TIME. Marks are allocated to specific components. A disorganised answer loses marks even if it contains the right information. Always use numbered steps and subheadings.

Step 1: Hypothesis
What to write
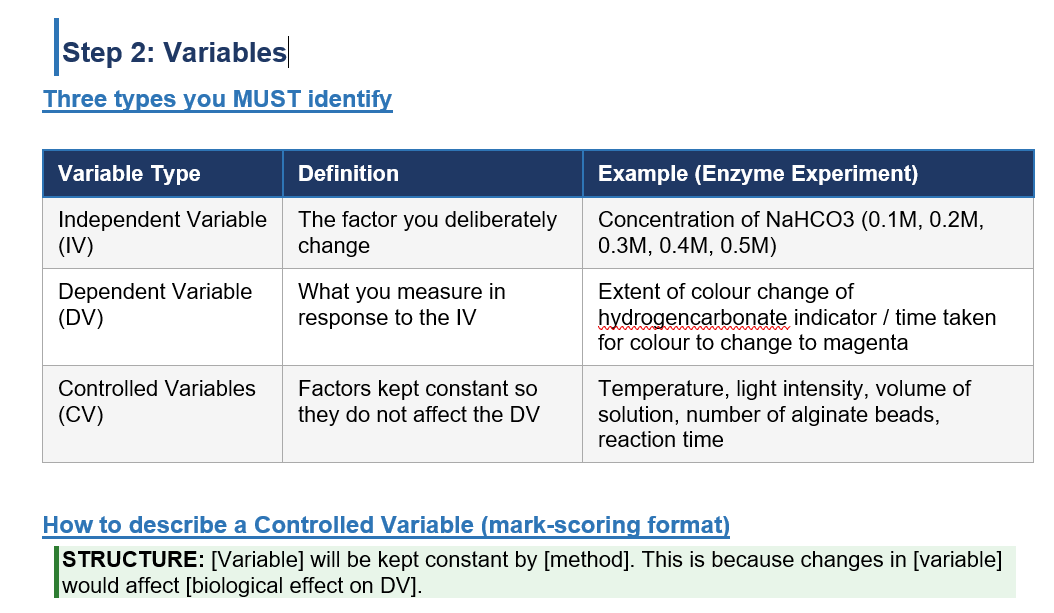
A hypothesis is a specific, testable, quantitative prediction of what you expect to happen, with biological justification. It must reference the independent variable (IV) and dependent variable (DV).

Exact Format
STRUCTURE: [DV] will [increase/decrease] as [IV] increases, because [biological mechanism].

Mark-scoring Example
“The rate of photosynthesis (measured by the extent of colour change of hydrogencarbonate indicator) will increase as the concentration of NaHCO3 increases, because a higher substrate (CO2) concentration increases the frequency of enzyme-substrate collisions at RuBisCO, increasing the rate of the Calvin cycle.”

NEVER write: “The plant will photosynthesise more.” — This is vague, has no reference to IV/DV, and no mechanism.

“Temperature will be maintained at 25°C using a water bath monitored with a thermometer. This is because changes in temperature alter the kinetic energy of molecules, affecting the rate of enzyme-catalysed reactions and hence the DV.”

Step 3: Control Experiment

A control experiment is a modified version of your experiment where the independent variable is removed or negated (replaced, NOT simply omitted). It proves that the result you observe is due to the IV and not any other factor.

CRITICAL RULE: You must REPLACE the IV — never just remove it. Everything else stays the same.


The full set of Planning notes is available in hard copy for students who sign up for any of our regular practical lessons, Crash Courses or Mock Exams.


Singapore Learner has been a Comprehensive Science Practical Training provider since 2017.

As at 19 Apr 2026, we have trained about 1060 students for their science practical exams and we have conducted a total of about 4044 lab sessions.

Our laboratory apparatus are exam-grade and similar to those used in MOE schools and our chemicals are all NEA-approved.


Why Choose Us?

  • Our teachers are very experienced, and we actually TEACH you good practical techniques.
  • We have been a one-stop comprehensive science practical centre providing solid practical training for ALL THREE sciences and for all levels and streams since 2017.
  • Our laboratory apparatus are exam-grade and similar to those used in MOE schools and our chemicals are all NEA-approved.
  • We have a structured practical training programme catering to the needs of both beginners and experienced students.
  • We have a small class size so that the teacher is able to observe the actions of each student more closely and demonstrate the correct practical techniques where and when necessary.
  • Many private schools trust us to prepare and conduct science practical training and assessment for their students, including structured training, mock exams and even actual CIE science practical exams.

Our Main Practical Programmes:

A-LEVEL H2 PRACTICALS (Available Nov to Oct)

O-LEVEL PRACTICALS (Available Nov to Oct)

PRACTICAL CRASH COURSES (Jun, July, Sep and Oct)

MOCK EXAMS FOR SCIENCE PRACTICAL (Apr to Oct)

Posted in Practical

Notes on Sources of Error in A-Level H2 Physics Practicals

1. Answering a Source-of-Error Question

Give the one or two factors inherent to the set-up, not a general list. Every answer has three parts: (i) the specific physical cause of the deviation; (ii) the quantity affected and the direction of the effect — systematic (biased) or random (scattered); (iii) a concrete precaution, with the reasoning for why it works where this is not obvious.

Rejected as “too general” unless further justified for the exact set-up:

  • Parallax error, without stating why it cannot be avoided here.
  • “Random error” or “human error”, without a stated cause.
  • Zero error — correctable by calibration or subtraction, not a genuine source of error.
  • “Instrument not precise enough”, without naming the reading it limits and why that matters.
  • Anything solved by “being more careful” or “repeating the reading” — repetition addresses random error only.

1.1 Random and Systematic Error

Source of ErrorEffect on the Reading / ResultPrecaution / Improvement
Random errorScatter about the true relationship, in either direction, from the limit of instrument resolution or from inexact repetition of a procedure.Average repeated readings; spread readings over the widest practicable range and take the gradient of a line of best fit rather than a value from any two points.
Systematic errorA constant bias in one direction, from an apparatus fault, an uncorrected offset, or a flaw in method. Displaces a y-intercept; does not, by itself, change a gradient.Not reduced by averaging. Identify and correct the fault, or choose the plotted quantities so the offset is confined to the intercept and the gradient — and any constant derived from it — is unaffected.

1.2 Precision of Common H2 Apparatus

ApparatusPrecision (Uncertainty)How to Read / Use Correctly
Metre rule / half-metre rule± 0.1 cmRead with eye level to the scale; avoid parallax.
Vernier calipers± 0.01 cmRecord zero error before use; read the coincident vernier division.
Micrometer screw gauge± 0.01 mmClose using the ratchet only; record zero error before use.
Digital multimeter± 1 in the last digit displayedSelect the most sensitive range without overload; resolution changes with range.
Digital stopwatch± 0.01 s (device); reaction time ≈ 0.2 s dominatesTrigger electronically (light gate, data logger) where the timed interval is short.
Light gate with data logger± (flag width / speed), typically sub-millisecondUse a narrow flag of known width so timed speed approximates instantaneous speed.
Cathode-ray oscilloscope± half the smallest division, scaled by the time-base or Y-gain settingSet gain/time-base so the trace fills the screen; read at eye level, not at an angle.
Signal generatorDial value may not equal true output frequencyConfirm frequency from the CRO trace period or a frequency counter, not the dial.
Temperature probe with data logger± 0.1 °C (probe); ± 0.5 °C (liquid-in-glass)Allow thermal equilibrium; keep the sensor immersed, clear of the vessel wall.
Newton meter / top-pan balance± 0.01 N or ± 0.01 g, model-dependentZero (tare) before each set of readings.

2. Mechanics

2.1 Simple Pendulum — Determination of g

T = 2π√(l/g); gradient of T² against l gives 4π²/g.

Source of ErrorEffect on the Reading / ResultPrecaution / Improvement
Amplitude too large: sin θ ≈ θ no longer holds.T is systematically longer than the true small-angle value; g calculated is too small.Release from < 10°; confirm T is unchanged when amplitude is reduced further.
Length measured to the bottom of the bob, or thread extends under load.l is recorded larger or smaller than the true effective length — a systematic error in g from the T²–l gradient.Measure to the bob’s centre (add its radius); use an inextensible thread and re-check l with the bob hanging.
Reaction time is a fixed error, large relative to one period.T is randomly high or low, with a large percentage error for a single swing.Time 20 oscillations and divide by 20, so the fixed error is spread over many periods; or time with a light gate at the lowest point of swing.

2.2 Free Fall with Light Gates — Determination of g

d = ut + ½gt²; plot d against t², gradient = ½g.

Source of ErrorEffect on the Reading / ResultPrecaution / Improvement
Interrupt flag has finite width.Gate measures an average speed over the flag width, not the instantaneous speed at that point — a systematic error in g.Use as narrow a flag as practicable, or apply the standard flag-width correction.
Fixed delay between release/trigger and timer start; air resistance not negligible for a light object.Every time is offset by the same constant, or g is systematically low.Plot d against t² and use the gradient — a fixed offset is absorbed into the intercept, not the gradient; use a small, dense sphere to keep air resistance negligible.

LOOKING FOR THE BEST PLACE TO DO YOUR SCIENCE PRACTICALS? JOIN US!

Singapore Learner has been a Comprehensive Science Practical Training provider since 2017.

As at 19 Apr 2026, we have trained about 1060 students for their science practical exams and we have conducted a total of about 4044 lab sessions.

Our laboratory apparatus are exam-grade and similar to those used in MOE schools and our chemicals are all NEA-approved.


Why Choose Us?

  • Our teachers are very experienced, and we actually TEACH you good practical techniques.
  • We have been a one-stop comprehensive science practical centre providing solid practical training for ALL THREE sciences and for all levels and streams since 2017.
  • Our laboratory apparatus are exam-grade and similar to those used in MOE schools and our chemicals are all NEA-approved.
  • We have a structured practical training programme catering to the needs of both beginners and experienced students.
  • We have a small class size so that the teacher is able to observe the actions of each student more closely and demonstrate the correct practical techniques where and when necessary.
  • Many private schools trust us to prepare and conduct science practical training and assessment for their students, including structured training, mock exams and even actual CIE science practical exams.

Our Main Practical Programmes:

A-LEVEL H2 PRACTICALS (Available Nov to Oct)

O-LEVEL PRACTICALS (Available Nov to Oct)

PRACTICAL CRASH COURSES (Jun, July, Sep and Oct)

MOCK EXAMS FOR SCIENCE PRACTICAL (Apr to Oct)

Posted in Practical

Notes on Sources of Error in A-Level H2 Chemistry Practicals

1. Answering a Source-of-Error Question

To get the mark for a sources-of-error question, give the one or two factors inherent to the procedure, not a general list.

Every answer has three parts: (i) the specific step and the chemical or physical reason the recorded quantity deviates from the true value; (ii) the quantity affected, stated as too high, too low, or inconsistent, and where relevant, how this propagates through the calculation (a rate constant, an enthalpy change, a Faraday constant); (iii) a concrete precaution, with the reasoning where this is not obvious.

State the effect on the quantity actually recorded, not on the underlying chemistry. At H2 level, examiners further expect the answer to engage with how the error enters the calculation — whether it biases a gradient, an intercept, or a value substituted directly into a formula.

Rejected as “too general” unless further justified for the exact procedure:

  • Parallax error, without stating which scale and why it cannot be avoided here.
  • “Human error” or “random error”, without a stated cause.
  • Zero error — correctable by taring or calibration, not a genuine source of error.
  • “Apparatus not accurate enough”, without naming the reading it limits and the resulting effect on the calculated quantity.
  • Anything solved by “being more careful” or “repeating the reading” — most sources examined at H2 level are systematic and are not removed by repetition.

1.1 Random and Systematic Error

Source of ErrorEffect on the Reading / ResultPrecaution / Improvement
Random errorScatter in either direction from the limit of instrument resolution or from inexact repetition — e.g. concordant titre volumes that still differ by up to 0.10 cm³.Repeat until titres are concordant (within 0.10 cm³) and average these; take multiple absorbance/conductivity readings and average; use the gradient of a best-fit line over single data points.
Systematic errorA constant bias in one direction throughout the experiment — e.g. heat loss to the surroundings in every calorimetry run, or a side reaction consuming part of a fixed current in electrolysis.Not reduced by repetition. Identify and correct the fault (insulate, use a control, correct for a side reaction), or choose what is plotted so the constant bias is confined to an intercept rather than a gradient.

1.2 Precision of Common H2 Chemistry Apparatus

ApparatusPrecision (Uncertainty)How to Read / Use Correctly
Burette± 0.05 cm³ (read to 2 d.p.)Read the meniscus at eye level; for deeply coloured titrants (e.g. iodine, potassium manganate(VII)), read the top of the meniscus.
Pipette (25.0 cm³ / 20.0 cm³)Fixed volume, delivered “to deliver”Allow to drain fully; touch the tip against the vessel wall; do not force the last drop out unless the pipette is graduated for it.
Electronic (top-pan) balance± 0.001 g to ± 0.01 g, model-dependentTare before each measurement; weigh by difference where possible, so any zero drift cancels.
Digital stopwatch± 0.01 s (device); human reaction time ≈ 0.2–0.3 s dominatesTrigger against a clearly defined cue (colour change, needle deflection); for a fast reaction, use continuous monitoring (colorimeter, gas syringe, pressure sensor) instead.
Colorimeter / UV-visible spectrophotometer± the last displayed digit of absorbance; also sensitive to cuvette handlingZero against a blank/reference solution before each run; handle cuvettes only by the ribbed sides, keeping optical faces clean and free of fingerprints.
pH meter / data logger± 0.01 pH unit (device); response time and calibration drift are larger sources of errorCalibrate with fresh buffer solutions immediately before use; allow the reading to stabilise before recording; rinse and blot the electrode between solutions.
Thermometer / temperature probe± 0.1 °C (probe); ± 0.5 °C (liquid-in-glass)Keep the sensor fully immersed and away from the vessel wall; allow thermal equilibrium before reading.
Gas syringe± 0.5 cm³, with plunger friction as an added source of lagCheck the plunger moves freely before use; keep the syringe horizontal and unobstructed.
Ammeter (electrolysis circuit)± the last displayed digit; also affected by drift in current over timeUse a variable resistor or rheostat to hold current constant; take ammeter readings at regular intervals and use the mean, or integrate current over time if it is not constant.

2. Volumetric Analysis

2.1 Preparation of a Standard Solution

n = m / M; the accuracy of every subsequent titration calculation depends on this concentration being correct.

Source of ErrorEffect on the Reading / ResultPrecaution / Improvement
Solid is not completely transferred from the weighing bottle/boat into the volumetric flask, or washings from the funnel and beaker are not added.Moles of solute actually in the flask is lower than the mass weighed implies, so the concentration prepared is lower than intended, biasing every titre calculated from it.Rinse the weighing bottle, funnel, and beaker several times with distilled water, adding all washings to the volumetric flask, before making up to the mark.
The flask is made up to the graduation mark with the meniscus viewed from above or below eye level, or is topped up past the mark.The true volume of solution differs from the flask’s stated volume, so the concentration calculated (moles / stated volume) does not match the true concentration.Add water dropwise near the mark with a dropping pipette, viewing the meniscus at eye level; discard and remake the solution if the mark is overshot.
The solution is not mixed thoroughly (inverted repeatedly with the stopper in place) after topping up.Concentration is not uniform throughout the flask, so aliquots withdrawn from different parts of it give inconsistent titres.Stopper the flask and invert it several times to ensure the solution is homogeneous before withdrawing any aliquot.

2.2 Acid–Base and Redox Titrations

n(analyte) = n(titrant) × mole ratio, from the stoichiometric equation; back titration finds excess unreacted reagent by titrating it against a second standard solution.

Source of ErrorEffect on the Reading / ResultPrecaution / Improvement
In an iodine–thiosulfate titration, starch indicator is added too early, while the iodine concentration is still high.Starch forms a strong iodine–starch complex that releases iodine only slowly, causing the end-point (loss of blue-black colour) to be over-run — titre recorded is too high.Add starch only when the solution has faded to a pale straw-yellow colour, close to the expected end-point, then continue titrating dropwise to the colourless end-point.
A back titration’s excess reagent is not accurately known — the volume/mass of excess-reagent solution added initially was not measured precisely, or the reaction with the analyte was incomplete before titrating the excess.The moles of reagent that reacted with the analyte (found by difference) carries forward the combined imprecision of both the initial addition and the second titration — the analyte’s calculated amount is inconsistent.Add the initial reagent by pipette or accurately prepared standard solution, and allow sufficient time (or gentle heating) for the first reaction to go to completion before titrating the unreacted excess.
Potassium manganate(VII), a self-indicating titrant, is used past its own colour fading point (solution is not swirled sufficiently near the end-point, so a local excess appears reacted).The end-point (first permanent trace of pink) is over-run in some regions of the flask while under-run in others — titre recorded is inconsistent between repeats.Swirl the conical flask continuously and add titrant dropwise near the expected end-point, until one drop causes a permanent, uniformly distributed, faint pink colour.
The reaction between titrant and analyte is slow at room temperature (e.g. some redox titrations), so the colour change appears to fade back after the recorded end-point.The volume recorded at the apparent end-point is too low, since the reaction had not yet reached completion.Warm the analyte solution gently (where the reaction permits, e.g. acidified oxalate–manganate(VII) titrations) to increase the rate, and titrate slowly near the end-point, allowing time for each addition to react fully.
A dichromate(VI) titration is carried out with no added indicator, on the mistaken assumption (true only of manganate(VII)) that the titrant is self-indicating.Dichromate(VI) and its reduced Cr³⁺ product are both coloured but do not give a sharp visual end-point on their own, so the end-point is missed or badly over-run.Add a redox indicator suited to the Cr⁶⁺/Cr³⁺ couple (e.g. a diphenylamine-based indicator), whose distinct colour change marks the end-point.

2.3 pH Titration Curves and Buffers

pH is monitored continuously as titrant is added; for a weak acid, pKa is read from the pH at the half-equivalence point.

Source of ErrorEffect on the Reading / ResultPrecaution / Improvement
The pH probe is not calibrated with fresh buffer solutions immediately before the titration, or calibration drifts over a long run.Every pH value recorded (and hence the pKa read from the curve) is offset from the true value by a roughly constant amount.Calibrate with two buffer solutions bracketing the expected pH range immediately before starting, and recalibrate if the titration is lengthy.
Titrant is added in large, evenly spaced volume increments throughout, including near the steep equivalence-point region.The equivalence point (steepest gradient) and half-equivalence point are poorly located, since few readings fall within the narrow volume range where pH changes fastest.Add titrant in small increments (e.g. 0.5 cm³) near the expected equivalence point; larger increments are acceptable elsewhere, so the curve is well-defined where it changes fastest.
The probe is rinsed insufficiently, or not rinsed at all, before being placed in a new solution.Contamination carried over from the previous solution biases early pH readings in the new titration.Rinse the electrode with distilled water and blot (do not rub) dry before each new titration or measurement.

The full set of notes, which includes more sections on Sources of Error by Practical Topic is available in hard copy for students who sign up for any of our regular practical lessons, Crash Courses or Mock Exams.


LOOKING FOR THE BEST PLACE TO DO YOUR SCIENCE PRACTICALS? JOIN US!

Singapore Learner has been a Comprehensive Science Practical Training provider since 2017.

As at 19 Apr 2026, we have trained about 1060 students for their science practical exams and we have conducted a total of about 4044 lab sessions.

Our laboratory apparatus are exam-grade and similar to those used in MOE schools and our chemicals are all NEA-approved.


Why Choose Us?

  • Our teachers are very experienced, and we actually TEACH you good practical techniques.
  • We have been a one-stop comprehensive science practical centre providing solid practical training for ALL THREE sciences and for all levels and streams since 2017.
  • Our laboratory apparatus are exam-grade and similar to those used in MOE schools and our chemicals are all NEA-approved.
  • We have a structured practical training programme catering to the needs of both beginners and experienced students.
  • We have a small class size so that the teacher is able to observe the actions of each student more closely and demonstrate the correct practical techniques where and when necessary.
  • Many private schools trust us to prepare and conduct science practical training and assessment for their students, including structured training, mock exams and even actual CIE science practical exams.

Our Main Practical Programmes:

A-LEVEL H2 PRACTICALS (Available Nov to Oct)

O-LEVEL PRACTICALS (Available Nov to Oct)

PRACTICAL CRASH COURSES (Jun, July, Sep and Oct)

MOCK EXAMS FOR SCIENCE PRACTICAL (Apr to Oct)

Posted in EDUCATIONAL ADVICE, Practical

Notes on Sources of Error in A-Level H2 Biology Practicals

These notes consolidate the recurring sources of error across common H2 Biology practicals — enzyme kinetics, photosynthesis, respiration, osmosis/water potential, microscopy, and quantitative technique — together with the planning conventions (dilution, controls, precision, statistics) that determine whether an error is even avoidable in the first place.

1. The H2-Level Standard for “Source of Error” Answers

1.1 What Distinguishes a Full-Mark H2 Answer

At O-Level, a source of error can often be stated qualitatively. At H2, examiners expect the same three-part structure, but each part must be more mechanistically explicit and quantitatively aware.

  • Name the exact step or material at fault — e.g. “the interval between removing each potato disc from the corer and placing it into solution was not standardised”, not “timing error”.
  • Explain the mechanism and direction of the effect — link it explicitly to the underlying biological or physical process (enzyme kinetics, diffusion, water potential, absorbance) and state whether the recorded value is an over- or under-estimate.
  • Propose an improvement that is specific, feasible with standard laboratory apparatus, and clearly removes the source of error rather than merely repeating a flawed method.

1.2 Random Error versus Systematic Error

Source of ErrorEffect on ResultHow to Overcome / Improve
Random errorUnpredictable variation between repeats or replicates, e.g. biological variation between algal beads, reaction-time variation in starting a stopwatch, or variation in cutting tissue by hand.Increase the number of replicates and repeats (H2 planning conventions typically call for a minimum of 3 replicates per condition and the whole experiment repeated at least once, giving 12–15 data points for statistical validity); calculate a mean and identify/exclude anomalies.
Systematic errorA consistent bias in one direction from a flaw in equipment, calibration or technique, e.g. an uncalibrated eyepiece graticule, evaporation from an uncovered water bath, or heat from a lamp confounding a light-intensity investigation.Identify and correct the specific flaw in technique or apparatus. Repeats will not remove a systematic error, since every trial is biased in the same direction.

1.3 Reliability, Validity and Statistical Confidence

Reliability refers to whether an experiment gives consistent results on repetition; it depends on reproducibility (would the same data be obtained if repeated using the same procedure) and variability (how much replicated data deviates from the trend or from each other). Validity refers to whether only the independent variable was allowed to vary, with every other variable adequately controlled. Where relevant, a t-test can be used to determine whether the difference between two means is statistically significant, and a chi-squared test can be used to determine whether observed and expected frequencies differ significantly — both may be examined on Papers 1–3, with the concept examinable on Paper 4.

2. Planning Conventions That Prevent Avoidable Error

2.1 Precision and Significant Figures

Recording precision must match the limit of reading of the instrument used. All raw readings of the same type must be recorded to the same number of decimal places, and processed data (rates, percentages, ratios) should follow the significant figures of the least precise raw measurement used in the calculation — except where doing so would make it impossible to distinguish one processed value from another, in which case a consistent number of significant figures is chosen that preserves the distinction.

InstrumentSmallest DivisionRecorded ToExample
Stopwatch0.01 s (digital display)nearest 0.01 s (full display)13.42 s, 50.11 s — record to the instrument’s full precision; state the uncertainty separately as ± reaction time (≈0.2–0.3 s), rather than rounding the reading itself
Ruler1 mm0.5 mm (0.05 cm)10.0 mm, 7.5 mm
Thermometer1 °Cnearest 0.5 °C or 1 °C23.0 °C, 40.5 °C
Balance0.01 g / 0.1 gmatching smallest division121.00 g / 121.1 g
Colorimeter / data loggerinstrument-specificas displayed, consistent d.p.0.482 (absorbance)

A count (e.g. number of bubbles, number of cells) is always recorded as a whole number — fractional counts are a common but avoidable presentation error. Note also that the balance and the digital stopwatch above are recorded to the full smallest division shown, not half of it: the half-division convention applies to analogue scales, whereas a digital display’s uncertainty is taken as ± the smallest displayed digit, since a digital reading cannot be halved.

2.2 Dilution and Serial Dilution

Most H2 investigations require candidates to prepare a range of concentrations from a single stock solution using the formula C₁V₁ = C₂V₂ (concentration of stock × volume of stock = concentration of final × volume of final). Unless the question specifies otherwise, five concentrations at regular intervals are expected. A serial dilution reduces concentration by a constant factor at each step (e.g. ten-fold), so that each new tube is prepared from the previous tube rather than from the original stock.

Source of ErrorEffect on ResultHow to Overcome / Improve
Dilutions calculated or measured using a single syringe/pipette across increasing or decreasing concentrations without rinsing between transfers.Carry-over of a more concentrated (or more dilute) solution contaminates the next dilution, so the actual concentration in each tube deviates from the intended value — the error compounds down a serial dilution series.Use a syringe sized appropriately for the volume being measured, rinse with distilled water between transfers, or dedicate one syringe per solution where practicable.
Bubbles trapped in the syringe when measuring small volumes of stock or diluent.The true volume of reagent delivered is less than the volume read off the syringe scale, so the actual concentration prepared differs from the intended concentration.Invert the syringe and tap gently to move bubbles to the tip before expelling them, then take the reading.
Stock solution left uncovered for an extended period before use.Evaporation increases the concentration of the stock, so every dilution prepared from it is more concentrated than intended.Prepare stock solutions freshly, or keep them covered/sealed until immediately before use.

2.3 Designing a Valid Control

A control must be produced by replacing the specific factor under investigation — never simply removing it, since removing a reagent entirely also removes the volume/dilution consistency of the set-up. The control shows that the change observed is due to the factor being investigated and not to some other variable.

InvestigationAppropriate Control
Effect of light intensity on photosynthesisIdentical set-up kept in complete darkness (e.g. wrapped in foil), rather than simply omitting the light source from the description.
Effect of substrate concentrationReplace the substrate with an equal volume of distilled water (i.e. absence of substrate, but volume kept constant).
Effect of enzyme concentrationReplace the enzyme with an equal volume of boiled-and-cooled enzyme, or with distilled water, keeping total volume constant.
Rate of respiration of yeastReplace live yeast suspension with an equal volume/mass of boiled-and-cooled yeast, or distilled water.
Rate of respiration of an insect or seedsReplace the specimen with inert glass beads of equivalent mass, to control for any change in gas volume/pressure not due to respiration.
Effect of temperature or pH on enzyme activityCannot be negated by omission; use boiled-and-cooled enzyme (or distilled water in place of enzyme) as the negative control instead.

The full set of notes, which includes sections such as Sources of Error by Practical Topic is available in hard copy for students who sign up for any of our regular practical lessons, Crash Courses or Mock Exams.


LOOKING FOR THE BEST PLACE TO DO YOUR SCIENCE PRACTICALS? JOIN US!

Singapore Learner has been a Comprehensive Science Practical Training provider since 2017.

As at 19 Apr 2026, we have trained about 1060 students for their science practical exams and we have conducted a total of about 4044 lab sessions.

Our laboratory apparatus are exam-grade and similar to those used in MOE schools and our chemicals are all NEA-approved.


Why Choose Us?

  • Our teachers are very experienced, and we actually TEACH you good practical techniques.
  • We have been a one-stop comprehensive science practical centre providing solid practical training for ALL THREE sciences and for all levels and streams since 2017.
  • Our laboratory apparatus are exam-grade and similar to those used in MOE schools and our chemicals are all NEA-approved.
  • We have a structured practical training programme catering to the needs of both beginners and experienced students.
  • We have a small class size so that the teacher is able to observe the actions of each student more closely and demonstrate the correct practical techniques where and when necessary.
  • Many private schools trust us to prepare and conduct science practical training and assessment for their students, including structured training, mock exams and even actual CIE science practical exams.

Our Main Practical Programmes:

A-LEVEL H2 PRACTICALS (Available Nov to Oct)

O-LEVEL PRACTICALS (Available Nov to Oct)

PRACTICAL CRASH COURSES (Jun, July, Sep and Oct)

MOCK EXAMS FOR SCIENCE PRACTICAL (Apr to Oct)

Posted in Practical

Notes on Planning for O-Level Chemistry Practicals

O LEVEL PURE CHEMISTRY

Paper 3 Practical — Planning (P)

Complete Student Notes, Strategies & Worked Example  |  6092/03

Paper 3 40 marks | 1h 50 minPlanning (P) ~4–6 marks per questionOverall Paper 3 = 20% of O LevelSyllabus 6092 (Pure Chemistry)

Section 1: What is Planning in O Level Chemistry?

Planning questions test your ability to design a complete, logical chemical investigation from scratch. Unlike Biology, Chemistry planning is less about biological mechanisms and more about: choosing the right apparatus, using correct quantities with precise measurements, applying chemical knowledge (equations, molar calculations, expected observations), and showing how you would interpret results to reach a conclusion.

Chemistry Planning is different from Biology Planning: You must always include specific masses/volumes (with units), name the specific instrument used to measure each quantity, state expected observations, and show any necessary molar calculations. Vague answers like ‘add some acid’ score zero.

The Four Pillars of Every Chemistry Planning Answer

PillarWhat It RequiresMark Value
1. VariablesState IV (what you change), DV (what you measure), and CVs (what you keep constant) with specific quantities1 mark
2. ProcedureNumbered steps with: specific apparatus, specific masses/volumes, method of measurement, expected observations1–2 marks
3. Calculations / Treatment of ResultsShow how the measurements are used to calculate the answer or compare results, with equations and units1–2 marks
4. ConclusionState clearly how results are interpreted to answer the investigation question1 mark

Key O Level Chemistry Rule: Always use mass, volume, or concentration — NEVER ‘amount’. Use specific instrument names: ‘electronic balance’, ‘measuring cylinder’, ‘gas syringe’, ‘burette’. Quantities must be specific and reasonable.

Section 2: The Three Types of Chemistry Planning Questions

O Level Chemistry planning questions fall into three broad types. Recognising the type immediately tells you what the DV is, what apparatus you need, and what your calculation/conclusion looks like.

Type A: Rate of Reaction Investigations

You investigate how a factor (temperature, concentration, surface area, catalyst) affects how fast a reaction proceeds.

FeatureDetails
Typical IVsTemperature / °C, concentration of acid / mol dm⁻³, particle size (powder vs chips), presence/absence of catalyst
Typical DVsTime for reaction to complete (disappearing cross / colour change) / s; volume of gas collected / cm³ in fixed time; initial rate of gas production
Key CVsSame mass/volume of reactant; same concentration of other reagent; same temperature (if not the IV); same total volume of solution
MeasurementStopwatch for time; gas syringe for volume; electronic balance for mass
ConclusionLower time = higher rate. Higher volume of gas in fixed time = higher rate. Draw graph of rate vs IV; steeper gradient = greater effect.

Calculating rate: Rate = volume of gas (cm³) / time (s)   OR   Rate = 1 / time (s⁻¹). Use rate (not just time) as your DV when you want to show ‘how fast’.


LOOKING FOR THE BEST PLACE TO DO YOUR SCIENCE PRACTICALS? JOIN US!

Singapore Learner has been a Comprehensive Science Practical Training provider since 2017.

As at 19 Apr 2026, we have trained about 1060 students for their science practical exams and we have conducted a total of about 4044 lab sessions.

Our laboratory apparatus are exam-grade and similar to those used in MOE schools and our chemicals are all NEA-approved.

We provide A-Level / H2 / IP and O-Level Physics, Chemistry, Biology and Combined Science (Physics/Chemistry/Biology) Practical Training/Crash Course/Mock Exams for both local (eg. H2, Singapore-Cambridge) and international exams (CIE, Pearson Edexcel, IGCSE).

Why Choose Us?

  • Our teachers are very experienced, and we actually TEACH you good practical techniques.
  • We have been a one-stop comprehensive science practical centre providing solid practical training for ALL THREE sciences and for all levels and streams since 2017.
  • Our laboratory apparatus are exam-grade and similar to those used in MOE schools and our chemicals are all NEA-approved.
  • We have a structured practical training programme catering to the needs of both beginners and experienced students.
  • We have a small class size so that the teacher is able to observe the actions of each student more closely and demonstrate the correct practical techniques where and when necessary.
  • Many private schools trust us to prepare and conduct science practical training and assessment for their students, including structured training, mock exams and even actual CIE science practical exams.
Our Main Practical Programmes:

A-LEVEL H2 PRACTICALS (Available Nov to Oct)

O-LEVEL PRACTICALS (Available Nov to Oct)

SEC 3 PRACTICALS (Available Nov to Jun)

PRACTICAL CRASH COURSES (Jun, July, Sep and Oct)

MOCK EXAMS FOR SCIENCE PRACTICAL (Apr to Oct)

Posted in Practical

Notes on Planning for O-Level Physics Practicals

O LEVEL PURE PHYSICS Paper 3 Practical — Planning (P)
Paper 3Planning (P)OverallSyllabus
40 marks │ 1h 50 min~5–6 marks per planning questionPaper 3 = 20% of O Level6091 (Physics)

Section 1: What is Planning in O Level Physics?

Planning questions test your ability to design a complete, logical physics investigation from scratch. Unlike open-ended experiments, a planning question gives you a proposed relationship between two quantities and asks you to design an experiment to verify it or find constants within it.

Physics Planning: You must always state clearly how you will measure each physical quantity, name the specific instrument, state how to control other variables, and describe how to extract a constant from a graph. Vague answers like ‘measure the voltage’ with no mention of instrument or method score zero.

The Four Pillars of Every Physics Planning Answer

PillarWhat It RequiresMark Value
1. VariablesState IV (what you change), DV (what you measure), and CVs (what you keep constant) — with specific quantities and symbols1 mark
2. ProcedureNumbered steps describing: specific apparatus, how IV is changed, how DV is measured, how many readings to take2–3 marks
3. Graph & AnalysisState the graph to plot, what gradient and intercept represent, and how to find the unknown constant from the graph1–2 marks
4. Additional DetailSafety precautions linked to specific hazards, and accuracy improvements specific to this experiment1 mark
Key O Level Physics Rule: Always use the same symbols as the equation given in the question. Write variables explicitly as ‘the independent variable is [symbol], which is [quantity].’ Measurements must be linked to a named instrument. Equations must be linearised step-by-step before stating the graph.

Section 2: The Three Types of Physics Planning Questions

O Level Physics planning questions fall into three broad types. Recognising the type immediately tells you what the DV is, what apparatus you need, and how to linearise the equation.

Type A: Electrical Circuit Investigations

You investigate how a circuit component (resistor, LDR, thermistor, capacitor) behaves as one electrical quantity is varied.

FeatureDetails
Typical IVsDistance from a light source / cm; temperature / °C; resistance / Ω; voltage / V; time / s
Typical DVsCurrent I / A; voltage V / V; resistance R / Ω; charge Q / C; count rate
Key CVsSupply voltage; other resistances in circuit; temperature of environment; light intensity of surroundings
MeasurementVoltmeter across component; ammeter in series; ohmmeter or calculate R = V/I; ruler for distance
ConclusionPlot suitable graph (e.g. R against d); gradient or intercept gives the unknown constant
Calculating Resistance: R = V / I. If measuring voltage across LDR (V_L) and voltage across fixed resistor (V_AB) with known R: current I = V_AB / R. Then R_LDR = V_L / I. Always state which voltmeter reading you are using.


LOOKING FOR THE BEST PLACE TO DO YOUR SCIENCE PRACTICALS? JOIN US!

Singapore Learner has been a Comprehensive Science Practical Training provider since 2017.

As at 19 Apr 2026, we have trained about 1060 students for their science practical exams and we have conducted a total of about 4044 lab sessions.

Our laboratory apparatus are exam-grade and similar to those used in MOE schools and our chemicals are all NEA-approved.

We provide A-Level / H2 / IP and O-Level Physics, Chemistry, Biology and Combined Science (Physics/Chemistry/Biology) Practical Training/Crash Course/Mock Exams for both local (eg. H2, Singapore-Cambridge) and international exams (CIE, Pearson Edexcel, IGCSE).


Why Choose Us?

  • Our teachers are very experienced, and we actually TEACH you good practical techniques.
  • We have been a one-stop comprehensive science practical centre providing solid practical training for ALL THREE sciences and for all levels and streams since 2017.
  • Our laboratory apparatus are exam-grade and similar to those used in MOE schools and our chemicals are all NEA-approved.
  • We have a structured practical training programme catering to the needs of both beginners and experienced students.
  • We have a small class size so that the teacher is able to observe the actions of each student more closely and demonstrate the correct practical techniques where and when necessary.
  • Many private schools trust us to prepare and conduct science practical training and assessment for their students, including structured training, mock exams and even actual CIE science practical exams.
Our Main Practical Programmes:

A-LEVEL H2 PRACTICALS (Available Nov to Oct)

O-LEVEL PRACTICALS (Available Nov to Oct)

SEC 3 PRACTICALS (Available Nov to Jun)

PRACTICAL CRASH COURSES (Jun, July, Sep and Oct)

MOCK EXAMS FOR SCIENCE PRACTICAL (Apr to Oct)

Posted in Practical

Notes on Planning for O-Level Biology Practicals

O LEVEL PURE BIOLOGY

Paper 3 Practical — Planning (P)

Paper 3 40 marks | 1h 50 minPlanning (P) 15% of Paper 3Overall Paper 3 = 20% of O LevelSyllabus 6093 (Pure Biology)

Section 1: Understanding the Planning Question

Planning questions in O Level Biology Paper 3 ask you to design a complete biological experiment to investigate a stated effect. They are worth 5 marks and test four core skills: identifying variables, describing a clear procedure, explaining how data leads to a conclusion, and assessing risks.

Key difference from H2: O Level Planning questions are more concise — typically 5 marks — but you still need all the same components. Every mark is attached to a specific component. Missing one component = losing a mark.

What Every Planning Answer Must Cover

ComponentWhat Examiners ExpectMarks at Stake
Independent Variable (IV)Clearly named with units. Must be the factor you deliberately change. 1
Dependent Variable (DV)Clearly named with how it is measured and units. 
Controlled VariablesAt least 2 variables kept constant, each with a method of control. One mark for naming + method. 1
Step-by-step ProcedureClear, numbered steps that another person could follow. Include quantities, volumes, timings. 1
Data / ConclusionHow results will be recorded (table), presented (graph) and interpreted to answer the research question. 1
Control ExperimentReplacement setup described with purpose stated. (Often embedded in procedure mark.)
Safety PrecautionSpecific hazard + specific precaution. Often 1 mark available. 1

O Level Reality Check: A 5-mark planning question typically allocates marks as: IV+DV [1], CVs [1], Procedure [1], Data/Conclusion [1], Control or Safety [1]. Always verify by re-reading the question’s bullet points.

Section 2: The 5-Step Formula for a Perfect O Level Plan

Use this structure every time. Examiners follow a mark scheme checklist. Organise your answer with numbered headings so each component is immediately visible.

Step 1: State the Independent and Dependent Variables

Always begin by explicitly naming both variables with their units. Do not make the examiner guess.

FORMAT: “Independent variable (IV): [Factor you change] / [unit]. Dependent variable (DV): [What you measure] / [unit].”

Common IV–DV pairs for O Level topics

TopicIndependent Variable (IV)Dependent Variable (DV)
EnzymesTemperature / °C, pH, enzyme/substrate concentration / %Time taken for reaction / s  OR  rate of reaction / s⁻¹
PhotosynthesisLight intensity (distance of lamp / cm), CO₂ conc. / %, temperature / °CNumber of bubbles / min  OR  time for indicator colour change / s
Respiration (yeast)pH, temperature / °C, glucose concentration / %Volume of CO₂ gas collected / cm³ per min  OR  height of froth / mm
OsmosisConcentration of sucrose / salt solution / mol dm⁻³Change in length / mass of plant tissue / mm or g
TranspirationWind speed (fan on/off), humidity, temperature / °C, light intensityRate of water uptake by potometer / cm³ min⁻¹

The full set of notes, which includes sections such as TopicSpecific Planning Tips is available in hard copy for students who sign up for any of our regular practical lessons, Crash Courses or Mock Exams.


LOOKING FOR THE BEST PLACE TO DO YOUR SCIENCE PRACTICALS? JOIN US!

Singapore Learner has been a Comprehensive Science Practical Training provider since 2017.

As at 19 Apr 2026, we have trained about 1060 students for their science practical exams and we have conducted a total of about 4044 lab sessions.

Our laboratory apparatus are exam-grade and similar to those used in MOE schools and our chemicals are all NEA-approved.

We provide A-Level / H2 / IP and O-Level Physics, Chemistry, Biology and Combined Science (Physics/Chemistry/Biology) Practical Training/Crash Course/Mock Exams for both local (eg. H2, Singapore-Cambridge) and international exams (CIE, Pearson Edexcel, IGCSE).


Why Choose Us?

  • Our teachers are very experienced, and we actually TEACH you good practical techniques.
  • We have been a one-stop comprehensive science practical centre providing solid practical training for ALL THREE sciences and for all levels and streams since 2017.
  • Our laboratory apparatus are exam-grade and similar to those used in MOE schools and our chemicals are all NEA-approved.
  • We have a structured practical training programme catering to the needs of both beginners and experienced students.
  • We have a small class size so that the teacher is able to observe the actions of each student more closely and demonstrate the correct practical techniques where and when necessary.
  • Many private schools trust us to prepare and conduct science practical training and assessment for their students, including structured training, mock exams and even actual CIE science practical exams.
Our Main Practical Programmes:

A-LEVEL H2 PRACTICALS (Available Nov to Oct)

O-LEVEL PRACTICALS (Available Nov to Oct)

SEC 3 PRACTICALS (Available Nov to Jun)

PRACTICAL CRASH COURSES (Jun, July, Sep and Oct)

MOCK EXAMS FOR SCIENCE PRACTICAL (Apr to Oct)

Posted in Practical

Notes on Sources of Error in O-Level Physics Practicals

1. How to Answer a “Source of Error” Question

A source-of-error question is not asking you to list everything that could go wrong — it wants the ONE or TWO factors that are inherent to this particular procedure/apparatus and would cause a genuine, unavoidable error in the final result. Structure every answer in two parts:

  • Part 1 — What is the source of error? Be specific: name the apparatus/step and the physical reason the reading is not exact.
  • Part 2 — How does it affect the result? State which quantity is affected, and whether it becomes larger than, smaller than, or larger/smaller than its true value.

Do NOT accept these as answers unless you can justify them further — examiners routinely reject them as “too general”:

  • Parallax error (only acceptable if you specify why parallax cannot be avoided in this exact set-up)
  • Random error / human error (on its own)
  • Zero error of an instrument (this is correctable by calibration, not a key source of error)
  • Anything fixed simply by “being more careful” or “repeating the reading”

1.1 Random Error vs Systematic Error

Source of ErrorEffect on the Reading / ResultPrecaution / Improvement
Random ErrorUnpredictable scatter, in either direction, caused by limits of precision or the experimenter’s inability to repeat a measurement identically. E.g. repeating a mass reading gives 17.46 g, 17.42 g, 17.44 g.Take repeated readings and average; take more data points for a graph so the best-fit line averages out the scatter.
Systematic ErrorA consistent bias in one direction throughout the whole experiment, usually from a fault in the apparatus or method. E.g. a stretched tape measure makes every length reading too small.Cannot be reduced by averaging. Must identify the faulty apparatus/method and correct or recalibrate it (e.g. account for zero error, use a different instrument).

1.2 Quick-Reference: Precision of Common Apparatus

ApparatusPrecision (Uncertainty)How to Read / Use Correctly
Metre rule / half-metre rule0.1 cmRead to the smallest division; eye vertically above the scale.
Ammeter (0–1 A)0.01 ARead to half the smallest division (0.02 A ÷ 2).
Voltmeter (0–3 V / 0–5 V)0.05 VRead to half the smallest division.
Laboratory thermometer0.5 °CRead to half the smallest division; last digit 0 or 5.
Stopwatch (digital)0.01 sRecord to 2 d.p. unless told otherwise.
ProtractorRead to the smallest division.
Measuring cylinder (100 ml)0.5 cm³Read at eye level, bottom of meniscus.
Spring balance (0–1 N)0.01 NCheck for zero error before use.
Spring balance (0–10 N)0.1 NCheck for zero error before use.
Digital micrometer / calipers0.01 mm / 0.01 cmClose jaws gently; check zero error.
Electronic mass balance0.01 gTare (zero) before every measurement.

2. Mechanics

2.1 Period of Oscillation (Simple Pendulum)

Source of ErrorEffect on the Reading / ResultPrecaution / Improvement
The thread is slightly elastic, or slips through the split cork.The effective length l of the pendulum is not what was recorded, so T is inaccurate.Measure and re-check l just before each timing; use an inextensible thread.
Reaction time in starting/stopping the stopwatch is significant compared to the period of one oscillation.T is either larger or smaller than the true value — the error is a larger fraction of the result for short single-oscillation timings.Time a large number of oscillations (e.g. 20) and divide by 20, so the fixed reaction-time error is spread over many swings and becomes negligible per oscillation.
The bob does not swing in one vertical plane (it swings elliptically) or amplitude is too large.The period recorded is not the true period for small-angle oscillation.Release the bob with a small amplitude and check it swings in a single plane; restart if it drifts.
The reference point used to judge “one complete oscillation” is not fixed.Miscounting oscillations changes T.Use the lowest point of the swing (highest speed, easiest to judge) as the reference point for counting.

Standard technique justification: measuring 20 oscillations and dividing by 20 divides the (constant) human reaction-time error by 20, greatly reducing its effect on the value of one period T.


LOOKING FOR THE BEST PLACE TO DO YOUR SCIENCE PRACTICALS? JOIN US!

Singapore Learner has been a Comprehensive Science Practical Training provider since 2017.

As at 19 Apr 2026, we have trained about 1060 students for their science practical exams and we have conducted a total of about 4044 lab sessions.

Our laboratory apparatus are exam-grade and similar to those used in MOE schools and our chemicals are all NEA-approved.

We provide A-Level / H2 / IP and O-Level Physics, Chemistry, Biology and Combined Science (Physics/Chemistry/Biology) Practical Training/Crash Course/Mock Exams for both local (eg. H2, Singapore-Cambridge) and international exams (CIE, Pearson Edexcel, IGCSE).


Why Choose Us?

  • Our teachers are very experienced, and we actually TEACH you good practical techniques.
  • We have been a one-stop comprehensive science practical centre providing solid practical training for ALL THREE sciences and for all levels and streams since 2017.
  • Our laboratory apparatus are exam-grade and similar to those used in MOE schools and our chemicals are all NEA-approved.
  • We have a structured practical training programme catering to the needs of both beginners and experienced students.
  • We have a small class size so that the teacher is able to observe the actions of each student more closely and demonstrate the correct practical techniques where and when necessary.
  • Many private schools trust us to prepare and conduct science practical training and assessment for their students, including structured training, mock exams and even actual CIE science practical exams.
Our Main Practical Programmes:

A-LEVEL H2 PRACTICALS (Available Nov to Oct)

O-LEVEL PRACTICALS (Available Nov to Oct)

SEC 3 PRACTICALS (Available Nov to Jun)

PRACTICAL CRASH COURSES (Jun, July, Sep and Oct)

MOCK EXAMS FOR SCIENCE PRACTICAL (Apr to Oct)


Topics Tested in Past O-Level Physics Paper 3 Practical Exam

Topics Tested in Past O-Level Chemistry Paper 3 Practical Exam

Topics Tested in Past O-Level Biology Paper 3 Practical Exam